Get Your Lawn Mower Ready For Spring: A Complete Guide To Spring Lawn Mower Tune Ups
- 4 minutes ago
- 12 min read
Every year homeowners must face the reality of getting their lawn care equipment out of storage and ready for use. If you dread this task because of improper storage or hard starts, you have come to the right place as the following article will outline for you the proper spring tune up procedures you can follow to make this task enjoyable and problem free. With a little planning and following the steps shown here, you will look forward to tending to your lawn care keeping needs year after year! Let's begin!
The Main Maintenance Items For A Complete Spring Lawn Mower Tune Up
Similar to your vehicle, there are specific wear items that must be inspected and replaced if necessary, to keep your unit operating in tip top condition. These include the engine oil, engine air filter, spark plug and cutting blade. We will examine each component in greater detail next.
Engine Oil Service
The only fluid your lawn mower needs to operate (aside from gasoline) is clean engine oil. It not only lubricates the engine's internal components by reducing friction, it also helps in dissipating heat. It is crucial that it is clean and filled to the proper level. After retrieving your unit out of storage, it is ideal to first perform an engine oil change. Additionally, it is best to drain old engine oil after it has warmed up to operating temperature as it flows more easily and ensures all contaminants are drained fully from the bottom of the oil sump. If your situation allows, run the machine for a few minutes to allow it to reach operating temperature before performing an engine oil change. Always get in the habit of checking your mower's engine oil level and quality before each use.
How to Perform an Engine Oil Change
First begin by removing the spark plug wire.
Determine if your unit is equipped with an engine oil drain plug (it would be located underneath the engine, below the deck.) This applies to older units as more recent models require the user to simply tilt the unit to drain old oil out of the oil filler neck.
Always tilt the unit with the carburetor and air filter side facing upwards!
Have an oil catch pan ready to drain the old oil into.
Add oil into the oil filler tube and read the dipstick, reading repeatedly until oil level reaches safe operating levels.
Reinstall spark plug wire and start machine.
Inspect for leaks.
Pro Tip: If you still have gasoline in the gas tank place a plastic bag over the gas tank filler neck and reinstall gas cap to prevent gas spilling.

What Engine Oil Should I Use?
SAE-30 oil is typically recommended for small engines during summer use, as it provides adequate lubrication under warmer operating conditions. However, multi-grade oils like 10w-30 and 5w-30 are also appropriate choices for various temperatures. Notice the '30' in all these grades? It signifies that the oils have similar viscosity in summer, with slight differences in winter, as indicated by the '10w' and '5w' designations. A higher number means the oil is more viscous or flows more slowly. For example, using SAE-30 oil in a snow thrower is not advisable because it isn't suitable for cold starting and colder operating conditions. The oil would be too thick to flow properly in colder temperatures, potentially leading to rapid engine wear and premature failure.
It’s important to recognize that small engines are air-cooled and typically operate at higher temperatures than water-cooled automotive engines. SAE-30 weight oil is thicker compared to most automotive oils like 5w-20 or 0w-20, which means it is more resistant to breaking down under high heat conditions. This resistance is partly due to the fact that the heat generated by small engines, such as those found in lawn mowers, is generally greater than that produced by car engines, making the correct choice of oil even more critical.
Some contemporary OHV (Overhead Valve Engine) manufacturers even advise that full-synthetic multi-grade oils, which are commonly used in automotive applications, are suitable for their engines. Certain lawn mowers may have a decal located near the oil dipstick indicating which oils should be used, making it easier for operators to select the right lubricant for their machine.
Some lawn mower operators have noticed that using full synthetic oil makes it easier to pull start the mower due to reduced resistance or drag compared to SAE-30. Additionally, some users report that multi-grade oils tend to burn off more quickly than SAE-30 oil in higher temperatures, which can cause levels to drop faster.
Another important aspect to consider is the design and operational needs of two-stroke engines. These mowers require special two-stroke oils that must be mixed with gasoline in a specific ratio to ensure proper combustion and lubrication. Pro Tip: To determine if your machine is a two-stroke, look for an engine fill reservoir or dipstick. If neither is present, it is likely a two-stroke engine. All four-stroke engines have a separate oil reservoir and dipstick, which is a key feature that helps you maintain your mower correctly and efficiently.
How to Read Your Engine's Oil Level Dip Stick

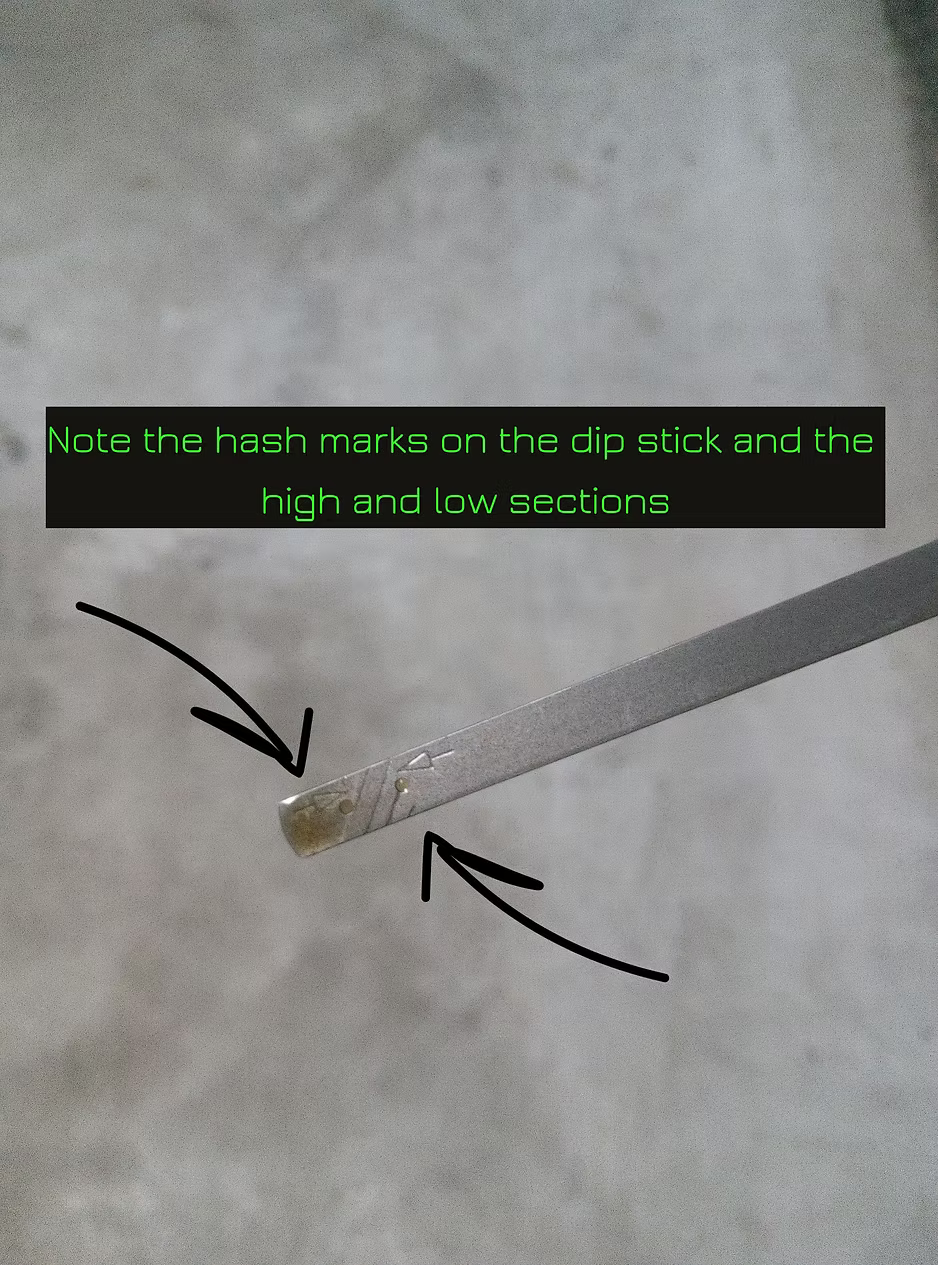
It is important to point out that just because your engine oil dipstick is threaded, this doesn't mean that it must be threaded back into the engine cover, in order to get an accurate reading. You must consult your machine's operator's manual to determine in fact you must thread in the engine dipstick or simply press it into the engine fill tube hole. Sometimes the dipsticks themselves will be labeled with information about this. Failure to determine this can lead to inaccurate readings!
Engine Air Filter Service
An often neglected part of lawn mower maintenance is preventing airborne abrasives from entering the engine. In fact it is one of the most beneficial and cost effective engine maintenance tips for lawnmower engines you can habitually abide by. Lawn mowers are designed with an air filter to capture harmful particles that could damage the engine.
It's essential to understand that combustion engines function essentially as air pumps. Air enters through the intake and is expelled after combustion through the exhaust. If dirt and debris, even if invisible, enter the engine, it can cause scratches to the cylinder walls, piston rings, bearing surfaces, etc.
Preventing this is crucial because seals between moving parts are necessary for optimal engine function, and if these sealing surfaces are damaged, engine performance suffers.
Repairing internal engine damage is often time-consuming and costly. Therefore, it's crucial to maintain your engine air filter. Regularly inspect and service it according to the manufacturer's recommended interval, typically every 25 hours of operation (a typical cutting season), or sooner if operating conditions are dusty or involve mowing tall grass.
It's important to distinguish between a foam and a paper filter. A great habit is to inspect your lawn mower engine air filter at each gas fill up.
For foam filters, clean them with dish soap, dry them, saturate with clean engine oil, and squeeze out the excess by hand. For paper filters, do not use this cleaning method; instead, replace them when they no longer allow sunlight to pass through easily. Do not use compressed air to clean them; replace them within the manufacturer's suggested interval.


Never operate your lawn mower without a clean air filter installed! Avoid costly repairs or premature replacement!
Spark Plug Service
After 100 hours of service, replace spark plug. This number may be reduced if the plug's electrode end has become completely blocked with carbon build up. Pro Tip: Always remove a spark plug from a cooled engine. Perform an overall inspection of spark plug wiring; cleanliness is key for wiring as dirt can hide broken wiring, and oil can rot the wiring insulation.
How To Read Your Spark Plug
Wipe away and clean the area near the spark plug hole to prevent dirt and debris from falling into the cylinder. Always use the correct size spark plug socket (it is deeper, and has a rubber insert inside).
Although some plugs may be stubborn on removal, always be sensible to protect the threads of the spark plug hole. When removing a stuck plug, if necessary, remove one full turn, then tighten half turn before removing fully.
After removal, you can "read" visual indicators on your spark plug, which can offer important insights into the overall condition of the machine's engine.
Fuel Fouling- Gray or Tan Fluffy, deposits near the electrode end
Oil Fouling- Black, Caked on lumpy deposits near the electrode end
Overheated plug-Excessively white, dusted appearance on electrode

Always Use The Correct Plug
If you happen to install a spark plug in your lawnmower or other small engine machine, always ensure it is the correct one! Yes, you can install incorrect spark plugs into small engines with varying results, none of which are good.
The length of the threaded portion of the spark plug is called the reach, and can vary between plug models. If you happen to install the incorrect spark plug with a greater reach into your lawn mower, because it is longer than it was intended to be it will reach down further into the cylinder; engine damage will result as the piston will rise and hit the extended portion of the plug. If an incorrect plug is installed with a shorter than necessary reach, the air and fuel mixture will burn too slowly, resulting in hard starting and a loss of power. Again, always install the correct plug stipulated by the engine manufacturer.
Furthermore, spark plugs run at different heat ranges, and the correct plug will run at the optimal heat range.If a colder plug is incorrectly installed in a colder running engine: heavy carbon deposits will form over the portion of the plug where the spark jumps a gap. (Normally, when running at ideal heat range this carbon would be burned off naturally in combustion process). If a hotter plug is installed in a hotter running engine, the plug may overheat.
In the next post, we will present the concept of spark plug "gaps", cross-referencing compatible spark plugs, and how to read plugs that have been removed from your engine.
Blade Sharpening Service
The method for sharpening cutting blades depends on the tool available. Angle grinders, bench grinders or hand files can all be used to sharpen a lawn mower cutting blade. Always inspect the blade for sharpness, and wear such as nicks and cracks. If any cracks detected replace the blade.
Focus on the outside 3 and a half inch of the cutting blade edge when sharpening; maintain the angle of the cutting edge when sharpening (approximately 25 to 30 degrees.) Nicks located outside the outer half inch of the cutting edge will not affect cutting ability of the blade.
The blade must be balanced before reinstalling as failure to do so may cause the machine to vibrate excessively. You want to ensure there is equal weight on both sides of the blade as material is removed in the sharpening process. There are several methods to achieve this, however the method shown below is one of the most simple.

Operator Practices to Follow to Prolong the Life of Your Mower
Manage Your Gas
More than 2/3rd's of all small engine related service calls stem from fuel-related problems. When you purchase gas for your lawn mower, try not to buy more than will be consumed within a month's time. Buying large amounts of gas and storing in your garage for extended periods, is a recipe for disaster. The ethanol in the gasoline attracts moisture and what occurs is what is called phase separation. Layers of water form in the gasoline container, or worse in the gas stored in your lawn mower's gas tank. The water in the gasoline wrecks havoc on small engines as water where it shouldn't be can cause corrosion in metal gas tanks, hard or no start conditions or poorly running machines. Store gas safely in an appropriate container, in a dry cool place, as this slows the break down process of gasoline. By simply following the general guideline of buying just enough gas that will be used within two mowing sessions, you can avoid most lawn mower issues.
Look for Blade Obstructions in Mowing Area Prior to Use
A great practice before you begin mowing is to survey the lawn for potential obstructions that may come in contact with the spinning blade. Try and prevent collisions with rocks, stones, lawn ornaments, branches, roots etc. If the blade strikes anything hard enough, it can render the machine irreparable, or at least not economically sensible to repair. Bent blades, crankshafts, and sheared flywheel keys are all possible outcomes. A bent blade or crankshaft will cause the unit to vibrate excessively if it is able to start. The excessive vibration will cause the machine to wear considerably faster, and affect mowing performance. If the flywheel key has sheared the machine will be impossible to start, and if the key is partially sheared it will either cause a dangerous starting condition; the pull rope will be yanked out of the operator's hand violently or it will stumble and miss with significant power loss. Avoid all of these conditions and mow carefully looking for objects that may come in contact with the blade.
Clean Your Mower's Deck After Each Use
Grass clippings, and dirt can accumulate on the underside of your lawn mower. It is best to use a putty knife and remove grass clippings before they have had a chance to adhere to the underside of the lawn mower for extended periods of time. If left uncleaned, mower performance will suffer as air cannot be directed properly over the contours designed into the deck's under body. Grass will not be effectively evacuated. Moisture from the grass will begin to corrode and rot the deck. You must never mow with a deck that has holes in it, as objects can be thrown through these holes and harm the operator or bystanders. By simply cleaning underneath your mowers deck, you avoid a rotted deck that is irreparable and would require immediate replacement. Gently scrape away grass clippings using a putty knife; avoid scratching or gouging the metal. It also wouldn't hurt to keep the top side of the deck clean to make it possible to detect potential sources of oil and or gas leaks. Having a unit covered in dirt or grass makes this next to impossible.
Keep Your Lawn Mower Out of the Elements
Never leave your lawn mower outside and uncovered for extended periods. Water will begin to accumulate in the gas tank through vent holes built into the gas cap. As explained earlier, the effect of water within a small engine is never good; avoid this problem and keep your mower out of heavy rainfalls.
Clean Cooling Fins


Lawn mower engines, like other small engines, are air-cooled. They depend on cooling fins and a spinning impeller/flywheel to circulate air and cool the engine.
When dirt and debris become packed in these cooling fins, they can't perform their cooling function as intended, resulting in an overheated engine. In short, an overheated engine wears out much faster. The solution: always ensure the area beneath the engine cover is free from grass or dirt buildup. The cover is usually secured with a few fasteners, so make sure the engine is off and cool before attempting to remove it.
Lubricate the Blade Brake Bail Cables and Linkages
Its important that you lubricate the metal cables that operate the blade brake bail bar that you must depress in order to start your lawn mower's engine. By spraying a silicone based lubricant into the areas shown, then manually engaging the bar to distribute the lubricant down into the cable, this will prevent seizure of the cable. If allowed to seize, they render the mower inoperable.

Storing Your Lawn Mower for Extended Periods
It is important that you plan to try and run your lawn mower dry of fuel at the last mowing session. There are fuel stabilizers available if fuel must be left for extended periods. If bowl style carburetor is used, be sure to drain the bowl to remove residual gas, locate the drain at the bottom of the bowl (if equipped.) Attempt to start mower again before storing. Remove spark plug, then remove the plug from the wire. Next, add a few squirts of clean engine oil to the spark plug hole, then gently pull start rope while engaging blade brake bail to distribute the oil to the internals of the engine. Reinstall spark plug by threading into the spark plug hole, tighten using appropriate socket and ratchet. Turn the throttle to off and close the choke (if both are manually operated.) Store the mower in a dry area.
By following this comprehensive guide to tuning up your lawn mower for spring, you can rest assured that your mowing seasons will begin headache free for years to come!

If you find this blog post helpful consider grabbing a copy of our Maverick Mowers Ultimate Lawn Mower Maintenance and Repair Guide: Empower Yourself and Skip the Expensive Service Bills Kindle eBook
Are you blocked by the belief that you're not the kind of person who can fix things? This book can help you get past that barrier and start trying.
Don't know where to start with lawn mower repair? We've gone from no experience to proven methods that are repeatable and they are revealed in this book.
Afraid you'll make things worse by tearing into your lawn mower? We understand the common pitfalls first hand and can guide you in low-risk ways to learn.
Are you tired of dealing with a troublesome lawn mower? Do you dread the next untimely and costly repair call? Well the time to take action is now!
Become independent and learn basic mechanical maintenance you can perform on your own, without the use of expensive specialty tools and save yourself money on completely avoidable and easily preventable repair bills!
Never the Norm!


Comments