Why Your Lawn Mower Won't Start and How to Fix It!
- May 10
- 14 min read
Are you stuck with a no-start lawn mower and in dire need to get mowing as soon as possible? Keep reading to learn the details of the most common reasons why your lawn mower won't start and how to fix it! Whenever diagnosing any mechanical problem it is necessary to understand some basic theory in order to strategically pinpoint the root cause of the issue. When attempting to diagnose, always start with the simple and most obvious first, then progress to less likely and more complicated causes. We will examine each of the three ingredients and likely causes of failure for each.
The Three Ingredients Necessary for Your Lawn Mower to Run-You Need to Know This!
Fuel
Spark
Air
None act completely in isolation, and all three ingredients are interrelated and dependent on each other. If one is missing the lawn mower will cease to operate. Knowing how the machine receives each of these ingredients and what is responsible for providing each, will help you to diagnose and properly fix no starts.


Fuel
First locate the lawn mowers fuel tank by looking for a fill cap and distinct gasoline decal. The first and most obvious check that can be done is checking inside the fuel tank for the presence of gasoline. If none is present look to add fresh gas to a cold machine.
[If gas is present:] How does it look? Is it clear and light or dark and murky? Lighter and clearer indicates fresher fuel.
[Are there any contaminants such as rust flakes or other debris visible?] The presence of contaminants can hinder the operation of the lawn mower. If spotted look to drain contaminated gas and replace with fresh gas, although this may not solve the issue if contaminants have obstructed the carburetor. We will go into greater detail on what it is and its function in a later section.
Pro Tip: To avoid the majority of small engine repairs always look to buy just enough gasoline that will be used within two mowing sessions. Buying gasoline in bulk and storing in your garage untreated will lead to a whole host of fuel-delivery related problems. In fact, it is estimated that 2/3rds of all service calls for small engines are fuel-delivery related, all stemming from the mismanagement of gasoline.
Also it is important to note that if your mower is left outside in the elements, water can make its way into the fuel tank. Water in gasoline will cause a no start lawn mower. To avoid water contamination, never leave your lawn mower outside in the elements for extended periods.
Gas Caps
Lawn mower gas caps are vented to prevent a vacuum from forming in the fuel system and preventing the flow of gasoline to the engine. If the vent becomes obstructed it can cause a unit to stall a short while starting. To check for this, if the lawn mower has stalled, look to remove the gas cap and listen for a distinct whooshing sound. This indicates a vacuum has formed. It is also important to note that with vented gas caps, these present another potential entry-point for water to make its way into the fuel system.
Fuel Lines
Most but not all lawn mowers have a fuel line running from the bottom of their fuel tank to the carburetor. Unlike your vehicle that uses a pump, a lawn mower simply uses gravity to feed the engine. Note: not all lawn mowers have a fuel line. If yours does, how does it appear? Is it cracking or flaking in appearance? If so this may indicate an internally collapsed fuel line. All this means is that the inner diameter of the fuel line is blocked and not allowing the free flow of fuel. To check for this you must remove the fuel line from the carburetor and inspect the flow of fuel through the fuel line, from the fuel tank. Is it free flowing? And is the flow the same diameter of the inside of the fuel line? If so, no obstruction is present.
The Effects of Ethanol
Ethanol added to gasoline speeds up its degradation with regards to small engine applications. Remember how we mentioned earlier how gasoline has a shelf-life and will degrade on its own? Well if you leave gasoline in your fuel tank for extended periods, (at earliest, longer than a month), it can begin to obstruct the carburetor and cause a no start. If you are aware of the presence of stale gasoline in the lawn mower it is wise to perform a carburetor cleaning after replacing stale fuel.
What's a Carburetor?
A carburetor is the metering device used to provide the engine with the proper mixture of fuel and air for differing engine demands. There are different demands for starting vs running for example. An enriched mixture of fuel is required to start a lawn mower vs. run a lawn mower. The important thing to understand is that within the carburetor are tiny ports and passageways that must be clean and clear in order for fuel and or air to flow through. If any dirt, debris or varnish formed from stale gas blocks these passages, the lawn mower will fail to start.
Walk through on How to Clean a Common Briggs Bowl-Style Plastic Carburetor (This May Not Match Your Mower Design But General Carburetor Cleaning Principles Remain the Same.)
Use a quality carburetor cleaner and compressed air (if available). The cleaning solution can should be equipped with a small spray tube necessary, in order to direct cleaning spray into small openings.
When you have located a port to be cleaned, direct spray until cleaning solution can be seen through an adjacent or connected opening as this ensures the pathway is cleared (when applicable).
Pro Tip: Always wear protective glasses to protect your eyes when using carburetor spray cleaner, wear nitrile gloves to protect against unnecessary exposure to gasoline and the cleaning solution itself. Never direct compressed air towards yourself or others.
In order for you to locate your carburetor, look for the engine air filter cover.

Be cautious, once you remove the carburetor, gasoline (if present inside the fuel tank) will begin to pour from the fuel inlet line. Either plug off the fuel line using appropriate pliers or drain fuel into an appropriate container.
A great practice is to snap a photo of all linkages before disassembly! This makes reassembly a breeze.

Your air filter cover will be held down with either some kind of fasteners or simply by clips, like this one.

After removing the air filter element, remove the fasteners holding the air filter box to the intake of your machine (these steps may vary with your machine but the premise remains the same).


Gently remove linkages, breather tube and anything else holding the carburetor to the intake manifold. Be sure not to bend any linkages.

Now that you have a visual reference of how the carburetor was arranged prior to disassembly, and hopefully taken a photo for future reference, you now have the carburetor separated from the unit; we can now begin strategically cleaning.

The first step to cleaning your bowl-style carburetor is to remove the bowl itself. For the example plastic style carburetor shown, there are two fasteners holding the bowl down. Be cautious as gas will likely be present inside the bowl.
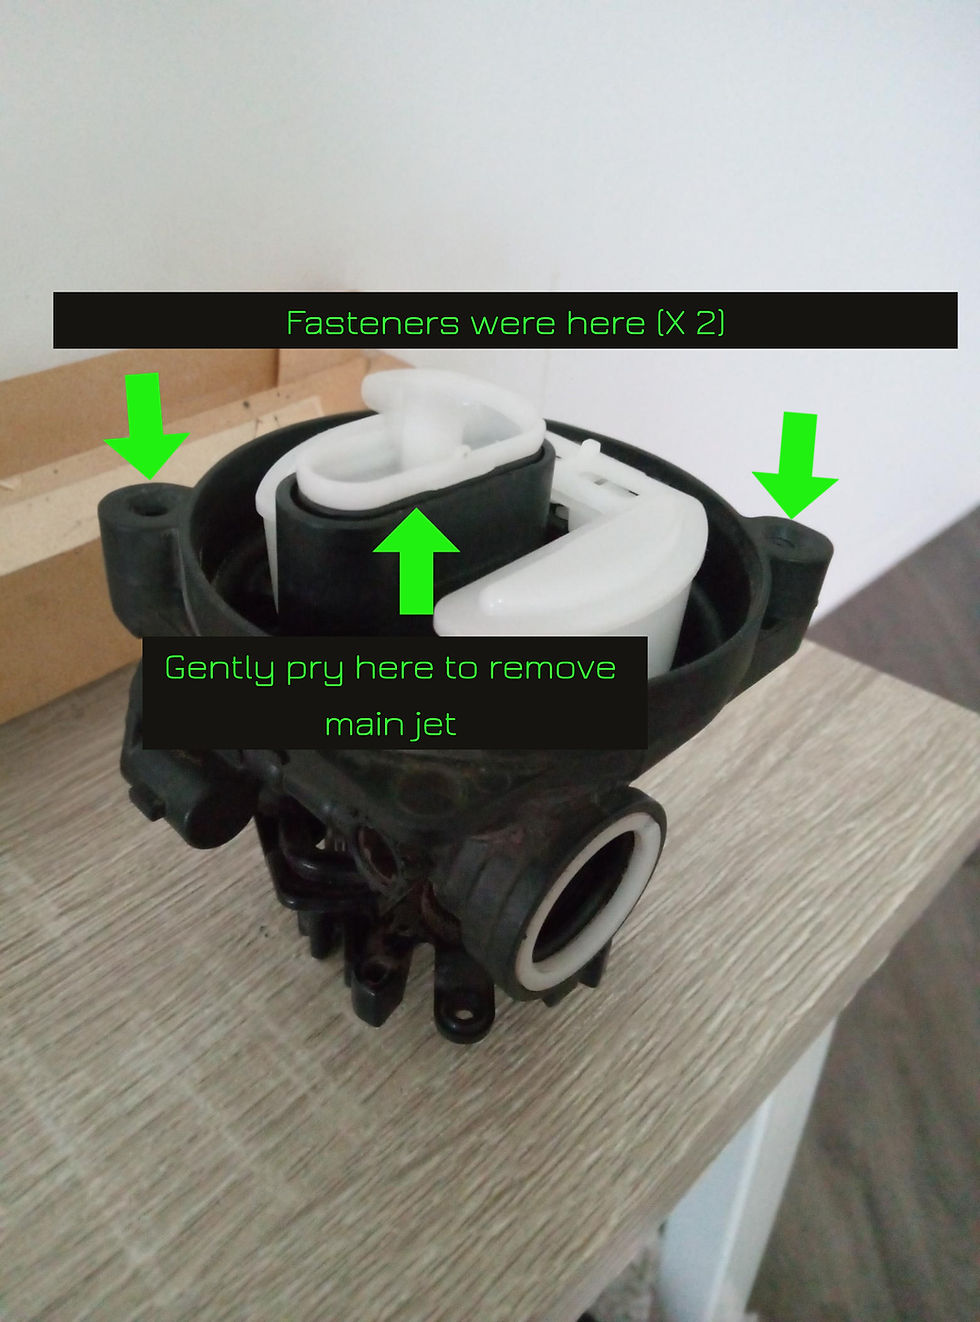
Below is the bottom of the bowl removed.


Pro Tip: If your carburetor is off an older lawn mower, the main jet may be in the bowl nut itself! Look for small holes going through the bowl nut on your mower and make sure that light can pass through, ensuring it is properly clean.

First, gently grab the hinge pin holding the float to the carburetor using needle nose pliers, to remove.


Be careful, when removing hinge pin not to lose it as it is a small component as well as the needle valve.

A symptom of a deformed or improperly seating needle valve are leaks from the carburetor bowl, or no starts due to flooding or fuel starvation! If you see any dents, to the needle valve tip or pitting, this component must be replaced.

The needle valve and float regulate the amount of fuel reaching the carburetor from the fuel tank. It rises and falls based on the amount of fuel inside the carburetor bowl. When enough fuel enters the carburetor bowl the needle valve must properly seat and prevent any more gas from entering the bowl.


Be sure not to lose the retainer and O-ring found on the throttle side of the carburetor!
When reassembling carburetor ensure that the needle valve is properly seated inside the needle seat, and that the float moves freely on the hinge pin. Ensure that the bowl and its O-ring is properly seated onto carburetor body and not kinked. Do not over-tighten the bowl fasteners to the carburetor body.
Improper Storage
At the end of the season it is necessary to follow proper storage habits to ensure your lawn mower is ready to run come next spring. Refer to our blog post: How to Properly Winterize Your Lawn Mower for Storage for the proper procedure to store your lawn mower.
Spark
In order for the fuel to be used to run a lawn mower a spark or ignition is needed to fire the engine. This is performed by the spark plug. Your basic walk behind lawn mower only has one.

If it is necessary to remove the spark plug from your small engine, always do so when the engine is cool. Wipe away and clean the area near the spark plug hole to prevent dirt and debris from falling into the cylinder. Always use the correct size spark plug socket (it is deeper, and has a rubber insert inside). Although some plugs may be stubborn on removal, always be sensible to protect the threads of the spark plug hole. When removing a stuck plug, if necessary, remove one full turn, then tighten half turn before removing fully.
After removal, you can "read" visual indicators on your spark plug, which can offer important insights into the overall condition of the machine's engine.
Fuel Fouling- Gray or Tan Fluffy, deposits near the electrode end
Oil Fouling- Black, Caked on lumpy deposits near the electrode end
Overheated plug-Excessively white, dusted appearance on electrode
Without getting into too much detail about spark plug components, on the threaded portion of a the plug there is whats called an electrode. The tiny air space between the second electrode that runs down the entire length of the plug is whats called the "gap".
If either oil fouling or fuel fouling is occurring, the carbon or oil deposits can become so severe that the gap on the plug becomes completely blocked.
The gaps on spark plugs can be adjusted using a special gapping tool. Follow instructions on the use of the gapping tool, provided by the manufacturer. Set the gap required for your engine model; never assume the gap is correct, and always check the gap of new spark plugs. The gap specifications will be located in your engine's service information.
With the spark plug removed, you can also inspect the electrode on the threaded side of the plug. Does it appear squared or rounded? A rounded electrode indicates it is worn and must be replaced.
Many lawn mower owners unknowingly face a no-spark issue that can develop into a fuel delivery problem. This often happens when the unit is left idle with gas in both the tank and carburetor. The gas can become stale and create blockages within the carburetor. Therefore, it’s essential not to overlook the importance of spark in the combustion equation. Ignoring this can compound the problem and make matters worse!
Assess Your Lawn Mower Ignition System,
A simple and free method to verify if you have spark is to remove your spark plug from the cylinder head of your lawn mower using an appropriate spark plug socket and ratchet.
Safety First! Always allow the engine to cool before removing the spark plug. Be careful not to damage the delicate aluminum threads in the cylinder head. Once the spark plug is removed, reattach it to the spark plug wire. To quickly assess whether you have spark, place the electrode end of the spark plug against the metal cylinder head of the engine. This grounds the ignition system, which will make more sense later.
If you’re alone when performing this test, place a phone or digital camera near the plug, where you can clearly record the spark plug electrode end resting against the engine's cylinder head. Next, pull the starter rope as if trying to start the engine. Follow all the steps you normally would to start your lawn mower, including holding down the blade brake bar.

If Spark Is Discovered
If you see a spark jump across the electrode of the spark plug while it is touching the cylinder head, you can move on to troubleshooting either fuel or air (compression) as possible culprits for your no-start condition. Please note that the condition of the spark may change after the lawn mower has started to run and is under compression (when screwed into the cylinder head inside the combustion chamber). This test checks whether your ignition system can produce a spark.
Video Sample: Here’s what you should see if you do have spark:
If No Spark is Discovered
If you pull the starter rope and do not see a spark, the next step is to examine the spark plug wire. Clean the wire if it is dirty, and look for potential tears or cracks. If no obvious damage is visible, proceed by removing your lawn mower's engine cover.
Follow These Steps to Recover Spark


With the flywheel exposed, you have a clear view of the ignition system of a lawn mower. To put it simply, as you pull the starter rope, the recoil assembly (normally built into the engine cover) spins the flywheel by engaging the flywheel cup (when the engine cover is attached). The spinning flywheel has magnets built into its sides that pass by the laminations or arms of the ignition coil.
Pro Tip: Many people think that if their pull rope becomes stuck, their engine is seized. Usually, this condition can either be a mechanical issue with the recoil assembly or a lack of necessary gap between the ignition coil and the flywheel. If the flywheel scrapes across the arms of the coil, it will result in a no-spark condition.
To remedy this situation, consult the service manual of your lawn mower engine manufacturer to reference the necessary air gap that must be set between the ignition coil and the flywheel. If the service manual is not readily available, a business card will work as its thickness is generally required for a push mower.
Begin by removing the spark plug from the cylinder head. Ensure you place a clean cloth inside the spark plug hole to prevent anything from getting inside the combustion chamber. This will make spinning the flywheel easier. To set the ignition coil gap, first loosen the two bolts holding down the ignition coil.
Next, move the coil away from the flywheel. Spin the flywheel by hand until the magnets engage the ignition coil's armatures, pulling it into contact with the flywheel. Visually note where the magnets are on the flywheel. Remove the ignition coil from the flywheel. When free, place a business card between the ignition coil arms and the flywheel magnets. Allow the ignition coil to be pulled into the flywheel with the business card wedged between the coil's arm and the flywheel.
Next, tighten the bolts holding the ignition coil down and remove the business card. There should now be a small air gap about the thickness of a business card between the flywheel and the ignition coil's laminations. The flywheel should be able to spin freely past the ignition coil without coming into contact with it.


Examine The Kill Switch Wire
If you have set the gap as explained above and examined the spark plug itself for carbon buildup at the electrode gap (refer to this post for more details: Your Spark Plug is Telling You Something...and it Never Lies: Read Your Spark Plugs Like A Pro), and its wire for any obvious tears or cracks, another potential culprit for a no-spark condition is the kill switch wire. The kill switch wire connects to the ignition coil.

You can repeat the above steps for testing for spark after simply removing the kill switch wire attached to the ignition coil. If, after you remove this wire, you suddenly see a spark jump across the spark plug gap, you can isolate your no-spark diagnosis to an issue with the kill switch wire and ground.
When you pull the blade brake bail to start your lawn mower, it moves the kill switch wire away from a ground, allowing spark to be produced. When you release the blade brake bail to shut off the engine, the wire comes in contact with a ground, preventing a spark and shutting off the engine. So, when you depress the blade brake bail to start the lawn mower, the ignition coil kill wire is removed from ground; when you release it, the wire is grounded.
The above procedures do not replace a proper diagnosis with a spark tester. However, they provide a free and easy way to initially test for spark in your lawn mower without using specialty tools!
AIR
An often neglected part of lawn mower maintenance is preventing airborne abrasives from entering the engine. In fact it is one of the most beneficial and cost effective engine maintenance tips for lawnmower engines you can habitually abide by. Lawn mowers are designed with an air filter to capture harmful particles that could damage the engine.
It's essential to understand that combustion engines function essentially as air pumps. Air enters through the intake and is expelled after combustion through the exhaust. If dirt and debris, even if invisible, enter the engine, it can cause scratches to the cylinder walls, piston rings, bearing surfaces, etc.
Preventing this is crucial because seals between moving parts are necessary for optimal engine function, and if these sealing surfaces are damaged, engine performance suffers.
Repairing internal engine damage is often time-consuming and costly. Therefore, it's crucial to maintain your engine air filter. Regularly inspect and service it according to the manufacturer's recommended interval, typically every 25 hours of operation, or sooner if operating conditions are dusty or involve mowing tall grass.
It's important to distinguish between a foam and a paper filter. For foam filters, clean them with dish soap, dry them, saturate with clean engine oil, and squeeze out the excess by hand. For paper filters, do not use this cleaning method; instead, replace them when they no longer allow sunlight to pass through easily.
Pro Tip: Do not use compressed air to clean them; replace them within the manufacturer's suggested interval.


Avoid unintentionally contaminating your air filter by improperly tilting your mower the wrong way. Learn how here: How to Properly Tilt Your Lawn Mower On Its Side: Your Probably Doing It Wrong!
Never operate your lawn mower without a clean air filter installed! Avoid costly repairs or premature replacement!
A sign of a dirty air filter other than a visual inspection of the filter itself is the presence of black smoke from the exhaust.
Operator Control Related No Start
Another cause of a no start may simply be the operator is unfamiliar with the starting procedure for their lawn mower. Various lawn mower designs have slight variations in how to perform a start up. Some require priming using a primer bulb, some have a manually controlled choke, while others have a manual choke. It is important to consult your machine's owners manual. You can also refer to our post here: https://www.maverickmowers.com/post/how-to-start-your-lawn-mower-for-the-beginner-a-step-by-step-guide
Did You Get Your Mower Running? If So What Was The Culprit?
0%Fuel related issue
0%Spark related issue
0%Air related issue
0%Operator control related


Comments