How to Extend the Service Life of Your Lawn Mower and Make it Last
- May 2
- 7 min read
Perhaps you've just purchased a new lawn mower and similar to any machine you own, your interested in maintaining it to maximize its longevity for years of trouble free use. The good news is certain prescribed measures can be taken to dramatically extend it's service life, none of which are particularly expensive or time consuming. The following article will set out to present what items to focus on, and how to service them in order to maximize the longevity of your mower. Following proper maintenance practices, expect your lawn mower to last 8-10 years, although it is not uncommon for lawn mowers to exceed this general life span. Of course, the opposite is true, conversely with poor maintenance practice, the lifespan decreases to about a third of this general ten year rule.
Preventive Maintenance
It's important that we define what preventive maintenance is before we present what maintenance items to focus on, when servicing your lawn mower for the long haul. Preventive maintenance by definition, is essentially preventing the break down of a machine by strategically following prescribed service intervals for various wear items. If ignored, certain parts may fail causing expensive down time and repairs. This is why a proactive approach to maintaining your lawn mower prevents avoidable down time and repairs. Don't wait for your lawn mower to stop working, stay ahead by following our prescribed list. Before you begin, its always a great safety measure to remove the spark plug wire from the unit before you begin working on it, to prevent any unwanted accidental starts or accidents.

If you find this blog post helpful consider grabbing a copy of our Maverick Mowers Ultimate Lawn Mower Maintenance and Repair Guide: Empower Yourself and Skip the Expensive Service Bills Kindle eBook
Gain valuable insights on topics such as:
How to clean your carburetor: a step by step guide
How to properly store your lawn mower for easy mowing next season
Secrets on how to solve and avoid many lawn mower maintenance headaches!
And so much more all in one easy to access and read eBook!
Keeping it Clean
Keeping your lawn mower clean not only serves to create an appealing appearance but can also extend its service life dramatically. Cleaning strategic areas of the machine are crucial, such as the engine cooling fins, flywheel cooling fins and the underside of the deck. We will dive deeper into each of these areas next.
Engine Cylinder Head Cooling Fins
Lawn mower engines unlike your car engine, are not water-cooled; instead they are considered air-cooled engines. They rely on the air-cooling affect of the spinning flywheel located on the top side of the engine. When the engine shroud is installed, it directs cool air to pass over the engine cooling fins designed to keep the engine cool and thus prevent overheating. Overheating significantly reduces the service life of your lawn mower engine. Always ensure that the engine cooling fins are unobstructed. To do so, remove the engine cover and make sure grass, dirt and other debris has not become packed into this crucial cooling area. Simply use a stiff wire brush and remove any debris. Wipe away any dirt or mud.

Flywheel Cooing Fins
In order for a fan like cooling effect to take place while the engine is running . The engine cover must be installed and the spinning flywheel must be clean. To inspect and clean simply remove the engine cover to reveal the flywheel underneath.


Following the same process as for the engine cylinder head cooling fins, simply use a stiff wire brush to remove any packed on dirt or debris. Wipe away any mud. Look to clean this area every 25 hours of operation or sooner if used in harsh conditions (tall grass, dusty areas, etc.)
Pro Tip: Avoid running the engine without the engine cover installed for extended periods as this may cause it to run hotter than usual. The engine cover works to contain the cooled air and direct it over the engine cylinder head cooling fins. This does not occur without the engine cover installed.
The Lawn Mower Deck and Underside
Keeping the lawn mower deck and its underside clean and cleared of grass build up goes a long way in preserving the life of your lawn mower. Allowing grass to stick to the underside introduces moisture and if left for extended periods, can cause corrosion and eventually through-rot holes. Never attempt to operate a lawn mower with holes in the deck as objects such as rocks and other debris can be ejected out at the operator or nearby bystanders. To clean the underside, first ensure the spark plug wire is disconnected, then simply tilt the lawn mower on its side. Ensure you do so correctly as failing to adhere to a simple rule outlined in this post: How to Properly Tilt Your Lawn Mower On Its Side: Your Probably Doing It Wrong! can cause major headaches! Next, using a putty knife gently scrape away grass buildup carefully so as to not scratch the paint. It is best to clean your lawn mower's underside ideally after each mowing session.
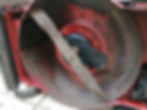
Engine Air Filter Maintenance

Never run your lawn mower without a clean engine air filter installed. It filters out harmful abrasives that may get sucked into the engine and cause premature wear on its internals. Simply remove the air filter cover and inspect. If it is a paper type like the one shown it cannot be cleaned if soaked in oil or gas. Instead it must be replaced. If lightly dirtied simply tap onto a firm surface to remove any grass or dirt. Do not used compressed air to clean paper filters! Another style of engine air filter is the foam type shown below. It can be cleaned and reinstalled if soaked in oil and gas. Simply place in a container of water and warm dish soap and let it soak overnight, then rinse and hand ring and allow to dry. Then following your operator's manual, saturate in clean, new engine oil and hand ring out the excess before reinstalling. It is best to inspect your engine's air filter at every gas fill up. Look to clean and or replace every 25 hours of operation.

Perform Engine Oil Changes
Changing your lawn mower's engine oil is crucial to prolonging the life of your machine. Always inspect the oil's condition prior to starting.

Clean engine oil will appear almost transparent or slightly bronzed whereas old and used oil will appear black and sludgy. Look to change your lawn mower's engine oil at the start or end of each mowing season. To check, simply make sure the mower is on level ground, and wait a few moments after it has run to get an accurate reading. Refer to your machine's owner's manual to verify if the dipstick must be threaded into dipstick hole or not for accurate readings!

How to Perform an Engine Oil Change
Allow the engine to run for a few minutes to warm the oil. Warm oil flows faster and more easily.
Remove spark plug wire.
Have an oil catch pan ready and either loosen drain bolt (found on older models) or simply tilt the unit so the oil can drain out the oil fill/dipstick tube.
Reinstall oil drain plug (if applicable).
Add engine oil slowly using an appropriate funnel (refer to your owner's manual for correct grade of engine oil and amount). Simply add to where the oil drained from.
Check oil level until the oil level is at the full mark on the dipstick. Add if necessary.

7. When proper oil level reached start unit and check for leaks.
8. After running allow to sit for a minute or so. This allows oil to drop down back into the reservoir and recheck oil level to verify. Do so on level ground.
Lubricate Linkages and Cables
It is advisable to use a non-silicone lubricant on all linkages and wire cables to prevent seizing. Look to lubricate at beginning and end of each mowing season. If a wire cable becomes seized you can attempt to free it up by spraying lubricant into the opening, however usually they become irreparable. Never attempt to operate a lawn mower with the safety stop cable bypassed because it has seized.

Take Care of the Quality of Gas Used
Being aware of the shelf life of gasoline can help to prevent untimely breakdowns and no-starts. Never buy gasoline in bulk and store in your hot garage during the spring and summer. This speeds up the degradation of the gasoline and is a recipe for lawn mower disaster. Buy just enough so that the quantity of gas purchased will be used in two to three mowing sessions.
Keep Blades Sharp
Using a sharp cutting blade not only produces a cleaner cut to prevent diseased grass but it also puts far less strain on the lawn mower's engine. Severely dulled or improper blades can cause frequent stalling, and forced restarts which all increase the strain on the machine.

Never Leave Your Lawn Mower Out in the Elements
Properly store your lawn mower inside your garage as leaving it outside can introduce water into the gas tank as well as speed up the formation of corrosion. Water found in the gas tank can cause a lawn mower to not run, if it even manages to start. Also critters can wreck havoc and build nests underneath engine covers, blocking the cooling affect of the air flow.
Properly Store Your Lawn Mower
At the end of the season look to run your machine's gas tank empty and if this is not possible look to add a fuel stabilizer if gas is to be left in the tank. Refer to our post here on more details of how to properly store your lawn mower at the end of the season: How to Properly Winterize Your Lawn Mower for Storage.
By following these simple steps you can be sure to get the most out of the service life of your lawn mower for many mowing seasons to come!
Never the Norm!